Hocus Pocus Halloween Cookies: A Spooky Sweet Treat
Every Halloween party needs that one treat that makes people’s eyes light up when it hits the table. For me, it’s always been cookies. Back when I was a kid, my mom used to whip up batches of chocolate cookies and let me go wild decorating with neon icing and candy. That messy, colorful chaos? That’s the spirit of Halloween right there.
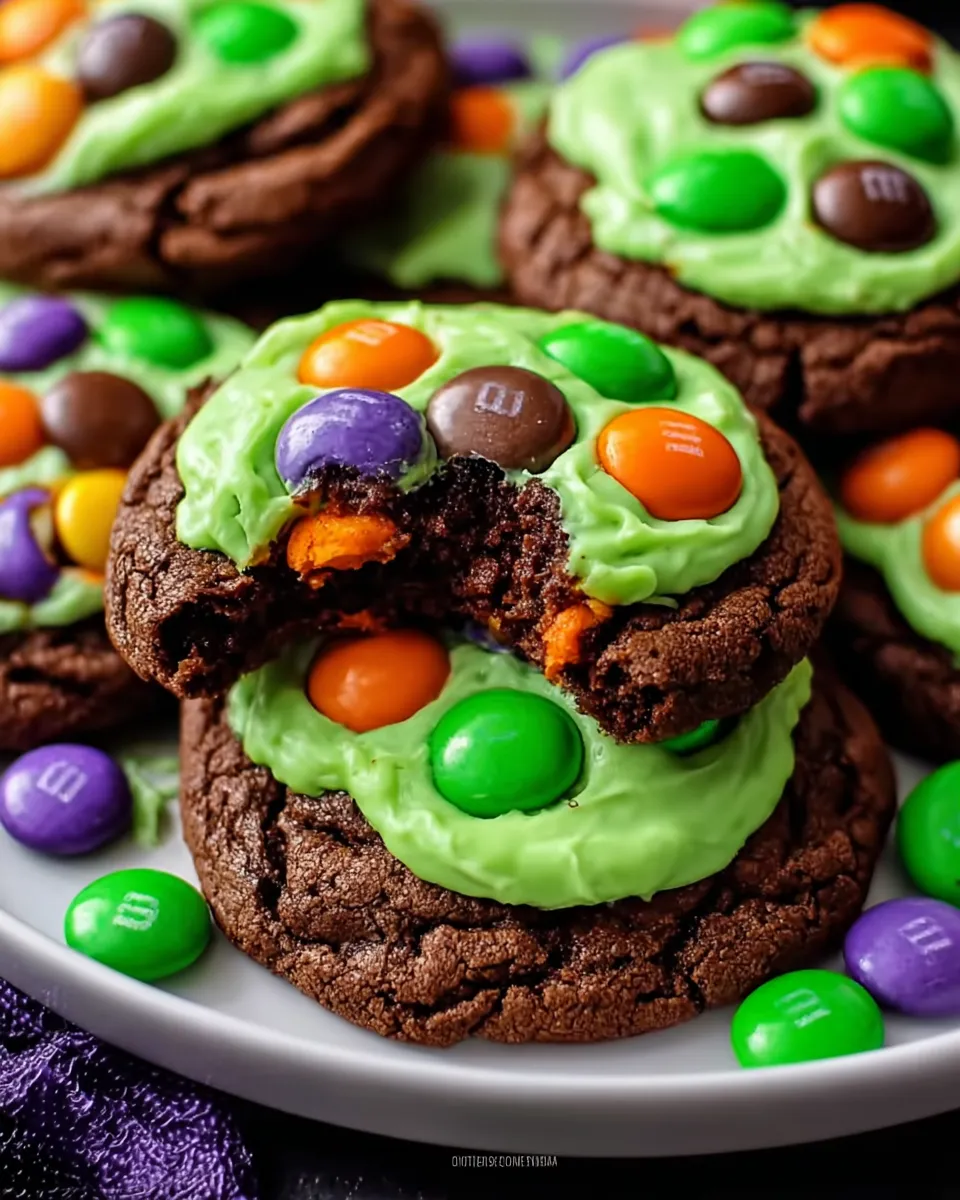
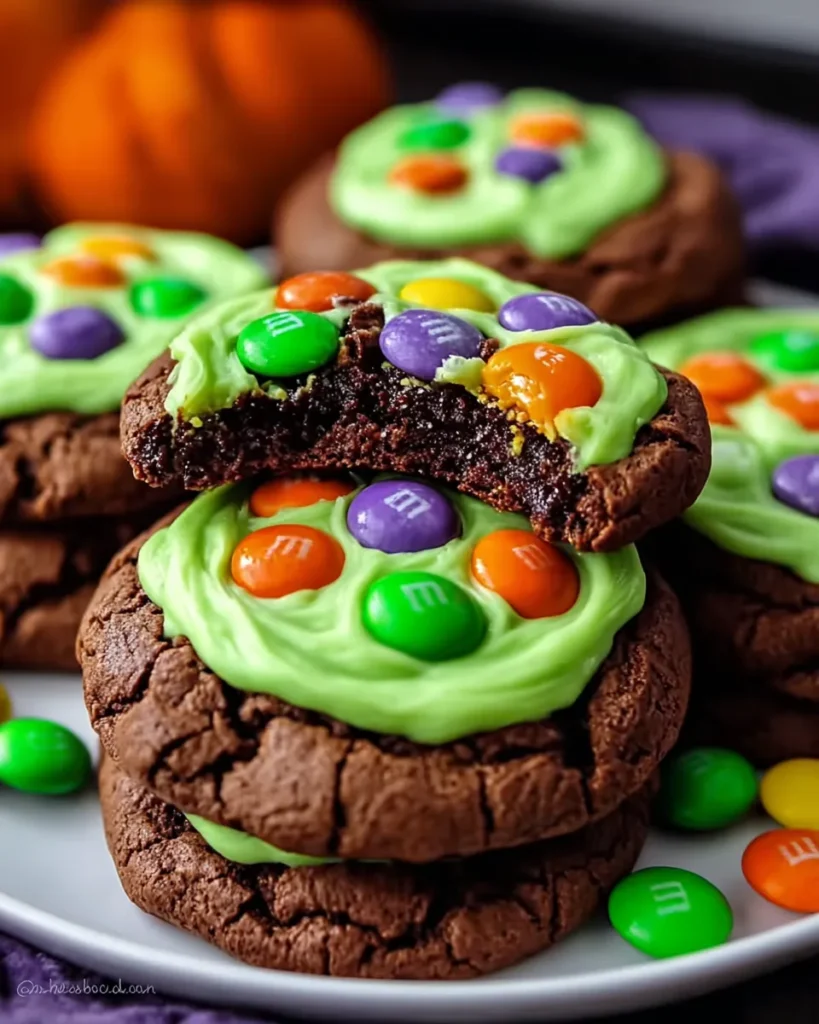
Now imagine taking that childhood memory, leveling it up with gooey neon-green frosting hiding inside, and topping it all with a shower of bright orange, green, and purple M&M’s. That’s what Hocus Pocus Halloween Cookies are all about—spooky, fun, and absolutely irresistible.
Table of Contents
What Makes Hocus Pocus Halloween Cookies Special
- Chocolate base: Deep, rich cocoa flavor that’s chewy in the center and crisp on the edges.
- Neon green frosting: Creepy and fun, it oozes out when you bite in—think “witch’s potion” but delicious.
- Colorful M&M’s: Orange, green, and purple candies give the cookies that Halloween party pop.
These aren’t just cookies. They’re edible decorations, conversation starters, and sugar-packed party fuel.
Why Hocus Pocus Halloween Cookies Are Perfect for Halloween Parties
- Easy to make in big batches.
- Kid-friendly decorating—let the little ones push M&M’s into the dough.
- Eye-catching colors that scream “Halloween.”
- That surprise frosting filling? Pure magic when guests take a bite.
Ingredients for Hocus Pocus Halloween Cookies
Here’s everything you’ll need to bring these Hocus Pocus Halloween Cookies to life. Don’t just glance at the list—each ingredient has a job to do.
- 1 cup sweet cream unsalted butter (room temperature)
Softened butter is key here. If it’s too cold, it won’t cream properly with the sugar, and if it’s melted, you’ll end up with flat cookies. Let it sit out for about an hour before baking. - ¾ cup granulated sugar
This gives you structure and a little snap around the edges. - ⅔ cup packed brown sugar
Adds moisture and chew. The molasses in brown sugar helps deepen the chocolate flavor. - 2 large eggs (room temperature)
Eggs bind everything together and help with richness. Room temp eggs mix more evenly into the dough. - 1 teaspoon pure vanilla extract
Don’t skip this—it boosts the chocolate flavor and rounds out the sweetness. - 2¼ cups all-purpose flour (sifted)
Provides the structure for the cookies. Sifting helps keep the dough light and avoids clumps. - ⅔ cup unsweetened cocoa powder
This is where the chocolate base gets its rich, deep flavor. Go with a good-quality cocoa—you’ll taste the difference. - 1 teaspoon baking soda
The leavening agent. It helps the cookies rise just enough without puffing them up like cake. - ¼ teaspoon salt
Just a little, but it’s crucial—it balances the sweetness and makes the chocolate pop. - 16 ounces white frosting (store-bought or homemade)
This is your gooey filling. Microwave it slightly so it’s soft enough to inject. - 5 drops neon green gel food coloring
Gel is better than liquid—it gives you that bold, spooky green without thinning out the frosting. Adjust the amount until it looks “witchy” enough. - 1 cup M&M candies (orange, green, and purple)
These aren’t just decoration—they’re what make the cookies scream Halloween. Use about half in the dough and press the rest on top for that bakery look.
Step-by-Step Instructions for Hocus Pocus Halloween Cookies
Step 1: Preheat & Get Ready
- Set your oven to 350°F (175°C). Always start with a hot oven—cookies need that immediate blast of heat to rise properly.
- Line your baking sheets with parchment paper. This keeps the bottoms from burning and makes cleanup easy.
- While the oven heats, separate your M&M’s. Keep the orange, green, and purple ones front and center—half will go inside, half on top for decoration.
Step 2: Build the Dough Base
- In a medium bowl, whisk together flour, cocoa powder, baking soda, and salt. Mixing dry ingredients first ensures even distribution—no random salty bites later.
- In a large mixing bowl, cream the butter, sugar, and brown sugar until light and fluffy. This step traps air in the dough, which is key for that chewy-yet-soft texture.
- Beat in the eggs one at a time, then stir in the vanilla. Adding eggs slowly keeps the mixture smooth instead of curdled.
Step 3: Combine & Add the Candy
- Gradually add the dry mixture into the wet mixture. Mix until it just comes together—don’t overmix, or you’ll get tough cookies.
- Gently fold in half of the M&M’s. These will melt into the dough for pops of color and crunch inside each bite.
Step 4: Shape & Bake
- Roll the dough into balls, about 2 tablespoons each.
- Place on the prepared baking sheet, leaving space for spreading.
- Press the remaining M&M’s onto the tops—this is the trick for picture-perfect bakery-style cookies.
- Bake for 9–11 minutes. The edges should look set, but the centers will still be soft—that’s what gives you that fudgy bite.
- Cool on a wire rack. (Don’t rush this step—hot cookies are fragile.)
Step 5: Fill with Witchy Green Frosting
- Soften the white frosting in the microwave for about 15 seconds—just enough so it stirs easily.
- Mix in the neon green food coloring until you’ve got that perfect spooky shade.
- Using a cookie injector, pipe frosting into the centers of the cooled cookies.
- No injector? No problem. Cut a small slit in the bottom or side of the cookie and spoon in frosting. The result is the same: a gooey, magical surprise in every bite.
Serving and Storing Hocus Pocus Halloween Cookies
- Best served warm—gooey filling makes them magical.
- Store in an airtight container:
- 3 days at room temp.
- 1 week refrigerated.
- Presentation: arrange on a Halloween platter with extra M&M’s scattered around.
Helpful Notes for Making Hocus Pocus Halloween Cookies
- Don’t overbake—the centers should stay soft.
- No injector? Use a piping bag or even a zip-top bag with the corner snipped.
- Optional: add sprinkles or edible glitter for extra Halloween flair.
Tips from Chef Tips for the Best Hocus Pocus Halloween Cookies
- Chef Sarah: Try orange or purple frosting for a multi-color spooky effect.
- Chef Jason: Chill dough for 30 minutes before baking—helps cookies keep their shape.
Why You’ll Love Hocus Pocus Halloween Cookies
- Gooey neon green frosting center = fun surprise.
- Bold, festive look with M&M’s.
- Easy to make with kids—decorating is half the fun.
- Perfect balance of chocolate richness and sweet frosting.
Variations on Hocus Pocus Halloween Cookies
- Switch up frosting colors (red for “bloody” cookies, blue for “witch’s brew”).
- Add a pinch of cinnamon or chili powder to the dough for a spicy twist.
- Make sandwich cookies by layering frosting between two chocolate cookies instead of injecting.
Related Recipes to Hocus Pocus Halloween Cookies
- Creepy and savory Halloween monster meatball sliders – A spooky main dish to balance out your sweet treats.
- Festive breadstick bones for Halloween parties – Perfect finger food for a themed buffet.
- Spooky skull potatoes to pair with themed cookies – A fun, savory side dish with a chilling twist.
- Chewy pumpkin snickerdoodles for fall dessert tables – A seasonal cookie that pairs beautifully with your Hocus Pocus batch.
Benefits of Hocus Pocus Halloween Cookies
| Benefit | Why It Matters |
| Fun for Parties | Bright M&M’s and neon frosting make these cookies stand out on any Halloween table. |
| Kid-Friendly | Easy steps and candy decoration let kids get involved without too much mess. |
| Surprise Filling | The gooey green center is a fun, spooky twist that impresses guests. |
| Rich Chocolate Flavor | Cocoa and brown sugar create a chewy, deep chocolate base. |
| Customizable | Change frosting colors, add sprinkles, or even make sandwich cookies for variety. |
| Make-Ahead Friendly | Dough can be chilled or frozen for stress-free party prep |
FAQ: Hocus Pocus Halloween Cookies
Q: Can I make the dough ahead of time?
Yes, refrigerate up to 48 hours before baking.
Q: Can I freeze these cookies?
Absolutely—freeze baked cookies up to 2 months. Thaw and fill with frosting before serving.
Q: Do I have to use neon green?
Nope! Any color works—purple, orange, even black for extra spooky vibes.
Conclusion
These Hocus Pocus Halloween Cookies aren’t just desserts—they’re little bites of spooky fun. With their rich chocolate base, oozing neon-green frosting, and candy-coated crunch, they’re the treat that’ll disappear faster than a witch at midnight.
So grab your mixing bowl, let the kids join in, and whip up a batch. Trust me—this is the Halloween cookie you’ll want on your table every year.
Now, go preheat that oven. These cookies aren’t going to bake themselves. And if you love this recipe, invite, visit my page on Pinterest for more festive baking ideas and spooky-sweet treats.
PrintHocus Pocus Halloween Cookies: A Spooky Sweet Treat

Spooky, fun, and absolutely irresistible Halloween cookies with a rich chocolate base, gooey neon-green frosting center, and festive M&M toppings.
- Prep Time: 20 minutes
- Cook Time: 11 minutes
- Total Time: 31 minutes
- Yield: 24 cookies 1x
- Category: Dessert
- Method: Baked
- Cuisine: American
Ingredients
- 1 cup sweet cream unsalted butter (room temperature)
- ¾ cup granulated sugar
- ⅔ cup packed brown sugar
- 2 large eggs (room temperature)
- 1 teaspoon pure vanilla extract
- 2¼ cups all-purpose flour (sifted)
- ⅔ cup unsweetened cocoa powder
- 1 teaspoon baking soda
- ¼ teaspoon salt
- 16 ounces white frosting (store-bought or homemade)
- 5 drops neon green gel food coloring
- 1 cup M&M candies (orange, green, and purple)
Instructions
- Preheat oven to 350°F (175°C) and line baking sheets with parchment paper.
- Whisk together flour, cocoa powder, baking soda, and salt in a medium bowl.
- Cream butter, granulated sugar, and brown sugar until light and fluffy.
- Beat in eggs one at a time, then stir in vanilla.
- Gradually mix in dry ingredients until just combined.
- Fold in half of the M&M’s.
- Roll dough into 2-tablespoon balls, place on baking sheet, and press remaining M&M’s on top.
- Bake 9–11 minutes until edges are set but centers remain soft.
- Cool cookies on wire rack.
- Microwave frosting for 15 seconds, stir in neon green food coloring.
- Inject or spoon frosting into centers of cooled cookies for a gooey filling.
Notes
Don’t overbake—keep centers soft. If no injector, use a piping bag or zip-top bag. Store up to 3 days at room temp or 1 week refrigerated.
Nutrition
- Serving Size: 1 cookie
- Calories: 210
- Sugar: 18g
- Sodium: 95mg
- Fat: 11g
- Saturated Fat: 6g
- Unsaturated Fat: 4g
- Trans Fat: 0g
- Carbohydrates: 28g
- Fiber: 2g
- Protein: 2g
- Cholesterol: 25mg
Keywords: Halloween cookies, spooky treats, Hocus Pocus, chocolate cookies, neon frosting