
Fruity Pebbles Cheesecake Tacos: A Colorful, Crunchy Dessert You’ll Love
Introduction to Fruity Pebbles Cheesecake Tacos
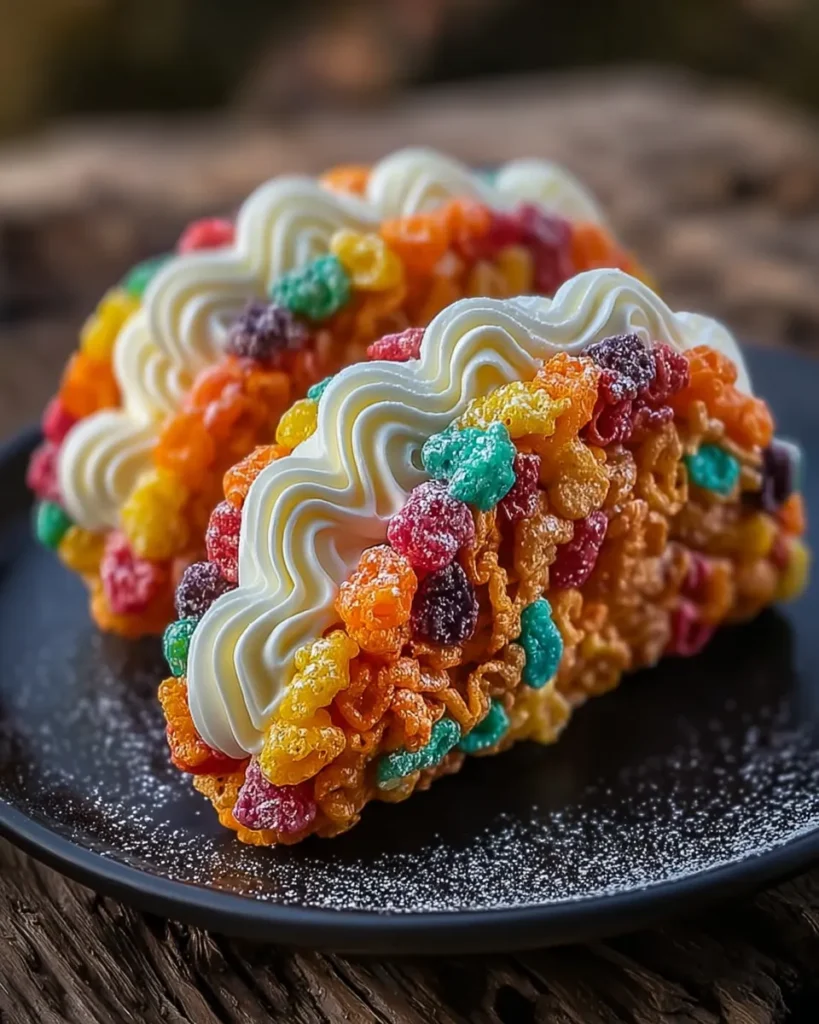
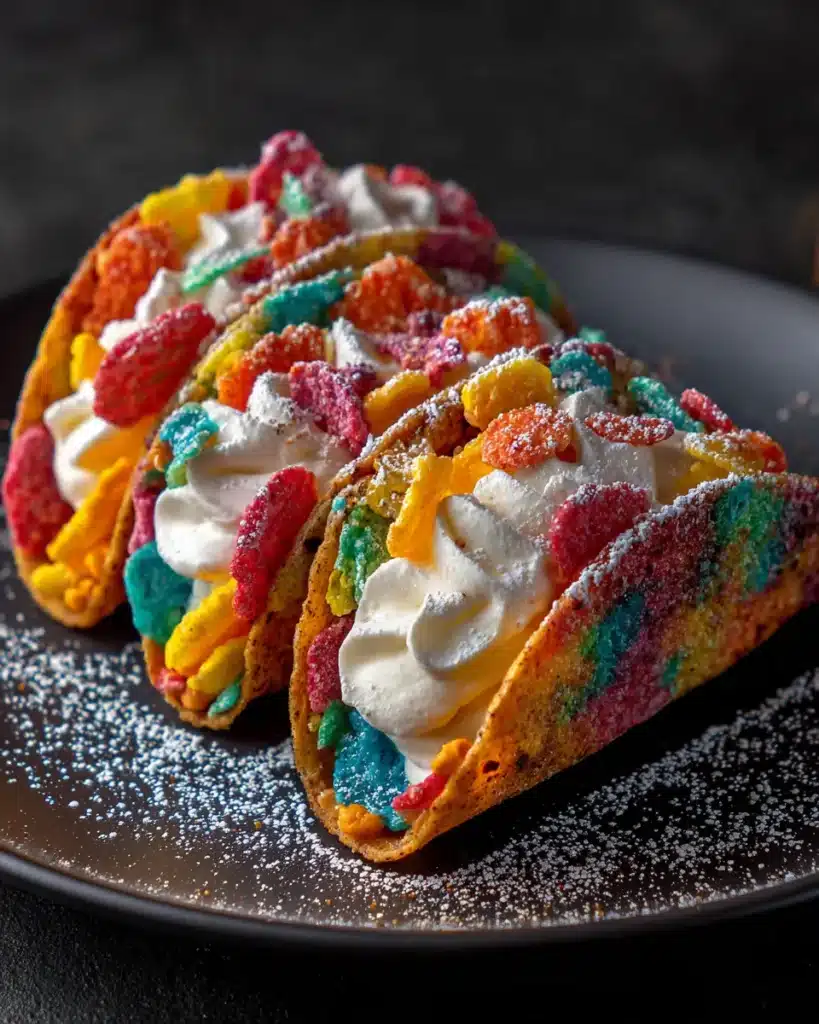
Alright, let’s talk dessert—but not just any dessert. Fruity Pebbles Cheesecake Tacos. Yeah, you read that right. It’s cheesecake. It’s tacos. It’s childhood nostalgia in neon cereal form. And it’s the kind of fun, over-the-top treat that makes people’s eyes light up the second you put it on the table.
You get the crunch from those rainbow shells, the creamy tang from the cheesecake filling, and that playful sweetness only Fruity Pebbles can deliver. It’s colorful, it’s nostalgic, and the best part? It’s surprisingly easy to pull off in your own kitchen.
Think of it as the ultimate mash-up: part dessert taco, part cheesecake, all fun.
Table of Contents
Ingredients for Fruity Pebbles Cheesecake Tacos
For Taco Shells
- 3 cups Fruity Pebbles cereal
- 4 tablespoons unsalted butter (melted)
- 2 tablespoons granulated sugar
For Cheesecake Filling
- 8 ounces cream cheese (softened)
- ½ cup granulated sugar
- ¼ cup sour cream
- 1 teaspoon vanilla extract
- ½ cup heavy cream (whipped to soft peaks)
For Coating
- 1 cup Fruity Pebbles, lightly crushed
Optional Toppings
- Whipped cream
- Fresh berries (strawberries, blueberries, raspberries)
- Chocolate shavings
- Extra Fruity Pebbles for garnish
Step-by-Step Instructions for Fruity Pebbles Cheesecake Tacos
1) Set Up & Crush (Prep is key)
- Heat the oven to 350°F (175°C). Line a sheet pan with parchment and lightly grease the back of a muffin tin (or set two wooden spoon handles between cans to use as “taco bars”).
- Crush Fruity Pebbles: Measure 3 cups and lightly crush—think pea-sized bits, not dust. (Too fine = gummy shells.)
- Why this matters: Bigger bits give structure and crunch; powder turns sticky and loses texture.
2) Make the Shell “Dough” & Bake
- Stir together: crushed cereal + 4 Tbsp melted butter + 2 Tbsp sugar. Mix until the cereal looks glossy and evenly coated—no dry pockets.
- Portion & shape for baking: Press 2–3 Tbsp mounds into flat 4–4½ inch rounds on the parchment (use a greased measuring cup or spoon to compact).
- Bake 8–10 minutes until edges look shiny and just start to set. They won’t brown much—go by glossy, bubbling edges.
Chef tip: Compact the rounds firmly; loose packing = shells that crumble.
3) Mold While Hot (most people mess this up)
- Work fast (10–20 seconds after they leave the oven): Slide a spatula under a round and drape it over the greased back of a muffin-cup row or across two wooden spoon handles to form a taco curve.
- Hold shape for 20–30 seconds until it grips, then let it cool completely on the mold so it sets crisp.
- Optional “waterproofing” (highly recommended): Brush the inside with a thin layer of melted white chocolate once cool; it keeps the shell crunchy longer.
- Common mistake: Waiting too long—once cool, you can’t bend them without cracking.
4) Make the No‑Bake Cheesecake Filling (smooth is the goal)
- Soften 8 oz cream cheese to room temp (very important) and beat with ½ cup sugar until creamy and lump-free, 1–2 minutes.
- Blend in ¼ cup sour cream + 1 tsp vanilla until smooth.
- Whip ½ cup heavy cream to soft peaks in a separate bowl; fold into the cream-cheese base in two additions. It should look silky and light, not soupy.
- Chill 30–45 minutes to slightly firm—piping becomes clean and stable.
- Chef cue: If you see streaks or grainy bits, your cream cheese wasn’t soft enough—keep mixing before adding the whipped cream.
5) Coat, Fill, Top & Serve (finish strong)
- Coating station: Lightly crush 1 cup Fruity Pebbles in a shallow dish. If you “waterproofed” with chocolate, dip the edges of each shell into the still-melted chocolate, then into cereal for a colorful rim.
- Fill: Pipe (or spoon) the chilled cheesecake into shells—don’t overfill or they’ll topple. Aim for a gentle dome.
- Top: Whipped cream, berries, extra cereal, or chocolate shavings. Keep it balanced—crunch + cream + fresh.
- Serve immediately for peak crunch. (If holding, refrigerate filled tacos up to 1 hour; any longer and you’ll lose snap—even with chocolate.)
Frank-style reminder: Shape while hot, don’t pulverize the cereal, and let that filling chill. Do those three, and you’ll nail the texture—crisp shell, silky center. This is the dessert taco you want to eat.
Tips and Variations for Fruity Pebbles Cheesecake Tacos
- Vegan version – Swap dairy-free cream cheese, vegan butter, and coconut whipped cream.
- Different cereals – Try Cocoa Pebbles, Cap’n Crunch, or even Cinnamon Toast Crunch for a twist.
- Add chocolate – Drizzle melted chocolate inside the shell before filling.
- Fruit fillings – Fold chopped strawberries or blueberries into the cheesecake mixture.
- Mini tacos – Make bite-sized versions using mini muffin tins—perfect for parties.
Storage Instructions for Cheesecake Tacos
- Store taco shells and cheesecake filling separately in airtight containers.
- Refrigerate filling for up to 2 days.
- Assemble tacos right before serving for the best crunch (if you fill them too early, the shells soften)
Related and More Fruity Pebbles Cheesecake Tacos
If you loved these cheesecake tacos with Fruity Pebbles, you might also enjoy these playful and indulgent desserts:
- Add extra flair with fruity cereal frosting ideas — perfect for topping your tacos or layering inside the cream filling.
- Try a creamy twist like this no-bake banana caramel dessert for more quick and easy no-bake inspiration.
- Kids will go wild for cotton candy cookies for whimsical treats — another colorful, fun dessert for parties.
- Explore layered sweets with banana pudding jars for layered desserts, a creative alternative to fruity taco shells.
- Or lean into breakfast-style indulgence with an easy cinnamon roll casserole for indulgent mornings
Benefits of Fruity Pebbles Cheesecake Tacos
| Benefit | Why It Matters |
| Fun & Nostalgic | Brings back childhood memories of Fruity Pebbles with a modern dessert twist. |
| Colorful Presentation | Bright, rainbow shells make this dessert eye-catching for parties and Instagram-worthy. |
| Texture Contrast | Crunchy cereal shells + creamy cheesecake filling = perfect bite. |
| Customizable | Easily swap cereals, add fruits, or drizzle with chocolate to make it your own. |
| Crowd-Pleaser | Great for birthdays, gatherings, or anytime you want to wow your guests. |
| Easy to Make | Simple steps, no baking beyond the shells, and quick assembly. |
Frequently Asked Questions about Fruity Pebbles Cheesecake Tacos
How do I keep the taco shells from getting soggy?
Store them in a cool, dry place and only fill right before serving.
Can I substitute Fruity Pebbles with another cereal?
Absolutely—Cocoa Pebbles, Froot Loops, or even Rice Krispies will work.
How long do these last?
Best enjoyed the day they’re made. Cheesecake filling keeps 2 days in the fridge, but shells lose crunch if stored too long.
Can I freeze Fruity Pebbles Cheesecake Tacos?
Not recommended—the cereal shells lose their texture after thawing.
Why Fruity Pebbles Cheesecake Tacos Are Worth Making
Fruity Pebbles Cheesecake Tacos are everything you want in a dessert: colorful, crunchy, creamy, and straight-up fun. They bring nostalgia to the table while giving you endless room for creativity—different cereals, fruit, chocolate, you name it.
Make a batch for a party, surprise the kids, or just treat yourself to something outrageous on a Saturday night. And when you do? Share your version, because half the fun of these tacos is seeing how wild people get with toppings.
This is the kind of dessert that makes people smile—and isn’t that the whole point? If you enjoyed this recipe and want more playful dessert ideas, invite visite my page Pinterest for inspiration and step-by-step visuals.
PrintFruity Pebbles Cheesecake Tacos: A Colorful, Crunchy Dessert You’ll Love
Fruity Pebbles Cheesecake Tacos are a colorful, crunchy, and creamy dessert that blends childhood nostalgia with a fun cheesecake twist.
- Prep Time: 30 minutes
- Cook Time: 10 minutes
- Total Time: 40 minutes
- Yield: 8 tacos 1x
- Category: Dessert
- Method: No-Bake + Oven Shells
- Cuisine: American
- Diet: Vegetarian
Ingredients
- 3 cups Fruity Pebbles cereal
- 4 tablespoons unsalted butter (melted)
- 2 tablespoons granulated sugar
- 8 ounces cream cheese (softened)
- ½ cup granulated sugar
- ¼ cup sour cream
- 1 teaspoon vanilla extract
- ½ cup heavy cream (whipped to soft peaks)
- 1 cup Fruity Pebbles, lightly crushed (for coating)
- Whipped cream (optional)
- Fresh berries (strawberries, blueberries, raspberries) (optional)
- Chocolate shavings (optional)
- Extra Fruity Pebbles for garnish (optional)
Instructions
- Preheat oven to 350°F (175°C). Line a baking sheet with parchment and grease the back of a muffin tin or set two spoon handles between cans.
- Lightly crush 3 cups Fruity Pebbles. Stir with 4 tbsp melted butter and 2 tbsp sugar until coated.
- Press 2–3 tbsp mounds into 4–4½ inch rounds on the parchment. Bake 8–10 minutes until glossy at edges.
- Quickly mold warm rounds over the muffin tin back or spoon handles to form taco shells. Let cool completely.
- (Optional) Brush inside of shells with melted white chocolate for crunch protection.
- Beat softened cream cheese with ½ cup sugar until smooth. Mix in sour cream and vanilla. Fold in whipped heavy cream until light. Chill 30–45 minutes.
- Coat shell edges in melted chocolate and crushed Fruity Pebbles (optional).
- Fill shells with cheesecake mixture. Top with whipped cream, berries, extra Fruity Pebbles, or chocolate shavings.
- Serve immediately for peak crunch or refrigerate up to 1 hour.
Notes
For best texture, shape shells while hot, don’t over-crush cereal, and chill filling before piping. Variations: try different cereals, vegan swaps, or add fruit to the filling.
Nutrition
- Serving Size: 1 taco
- Calories: 320
- Sugar: 24g
- Sodium: 180mg
- Fat: 18g
- Saturated Fat: 10g
- Unsaturated Fat: 7g
- Trans Fat: 0g
- Carbohydrates: 34g
- Fiber: 1g
- Protein: 4g
- Cholesterol: 45mg
Keywords: fruity pebbles, cheesecake, tacos, dessert, no bake, fun recipe