Red Velvet Cheesecake Bliss: The Dessert That Wins Every Time
Introduction to Red Velvet Cheesecake Bliss
There are desserts you eat, and then there are desserts you remember. Red Velvet Cheesecake Bliss falls squarely in the second category. It’s indulgent, comforting, and almost too pretty to cut into (almost). Imagine the velvety tang of cheesecake paired with the classic cocoa-kissed charm of red velvet cake. That’s a one-two punch of comfort and elegance in every bite.
It’s the kind of dessert that steals the show at a romantic dinner, shines at a family celebration, and fits right in at weddings or cozy Sunday gatherings. Simply put—it’s not just dessert, it’s an experience.
Table of Contents
What Makes Red Velvet Cheesecake Bliss Special?
- The perfect balance: moist red velvet cake hugging creamy cheesecake layers.
- Beginner-friendly: looks bakery-made but is surprisingly easy to put together.
- Wow factor: each slice looks like a little piece of edible art.
Red Velvet Cheesecake Bliss in My Family Story
When I was a kid, red velvet cake was the dessert my mom baked for every birthday. But one year, she decided to surprise us with a twist—she layered it with cheesecake. Game changer. That was the first time “Red Velvet Cheesecake Bliss” graced our table, and from then on, it became the family tradition.
Every holiday since, someone in the family requests it. It’s the kind of dessert that carries memories with it—birthdays, anniversaries, those moments when everyone’s crowded around the table with forks in hand, waiting for that first slice.
Why You’ll Love Red Velvet Cheesecake Bliss
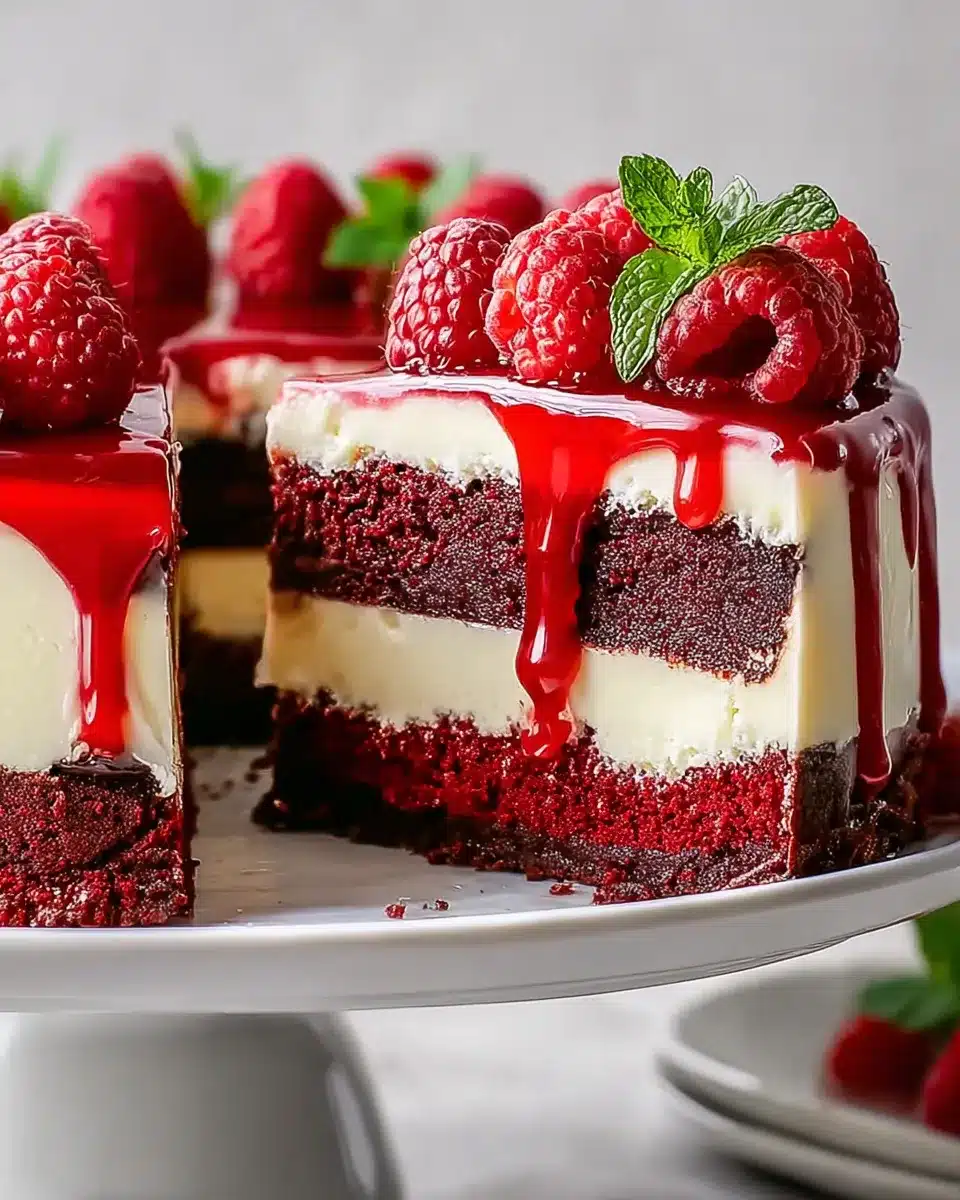
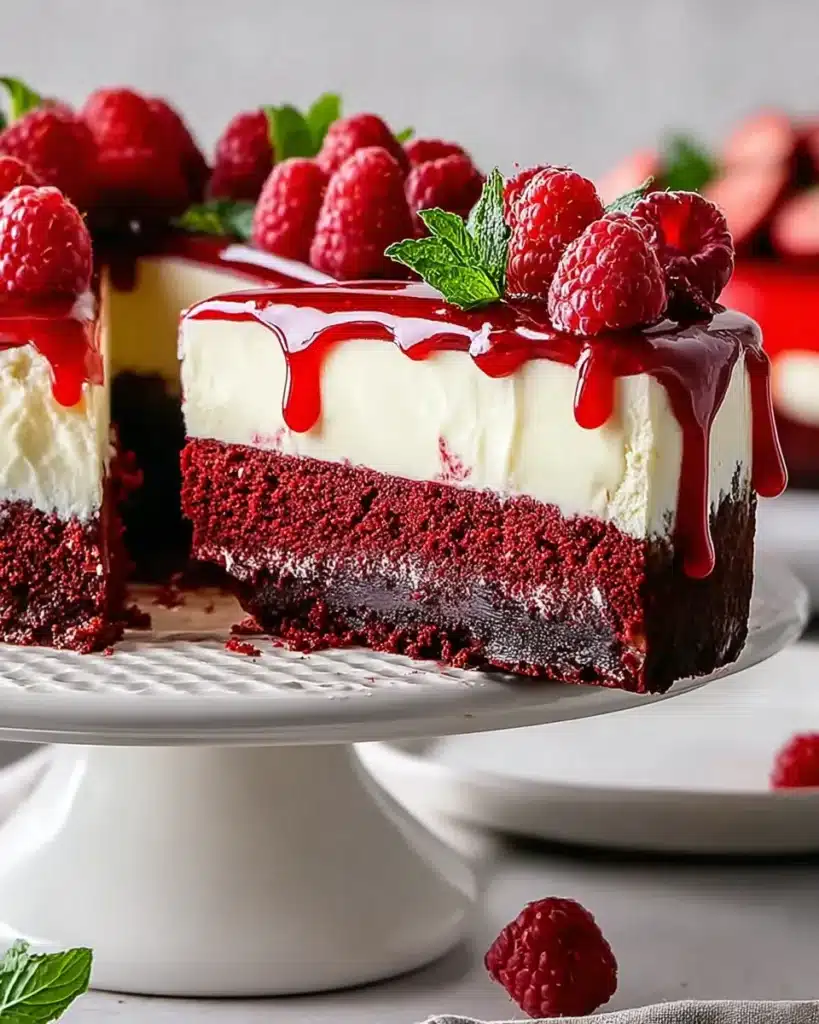
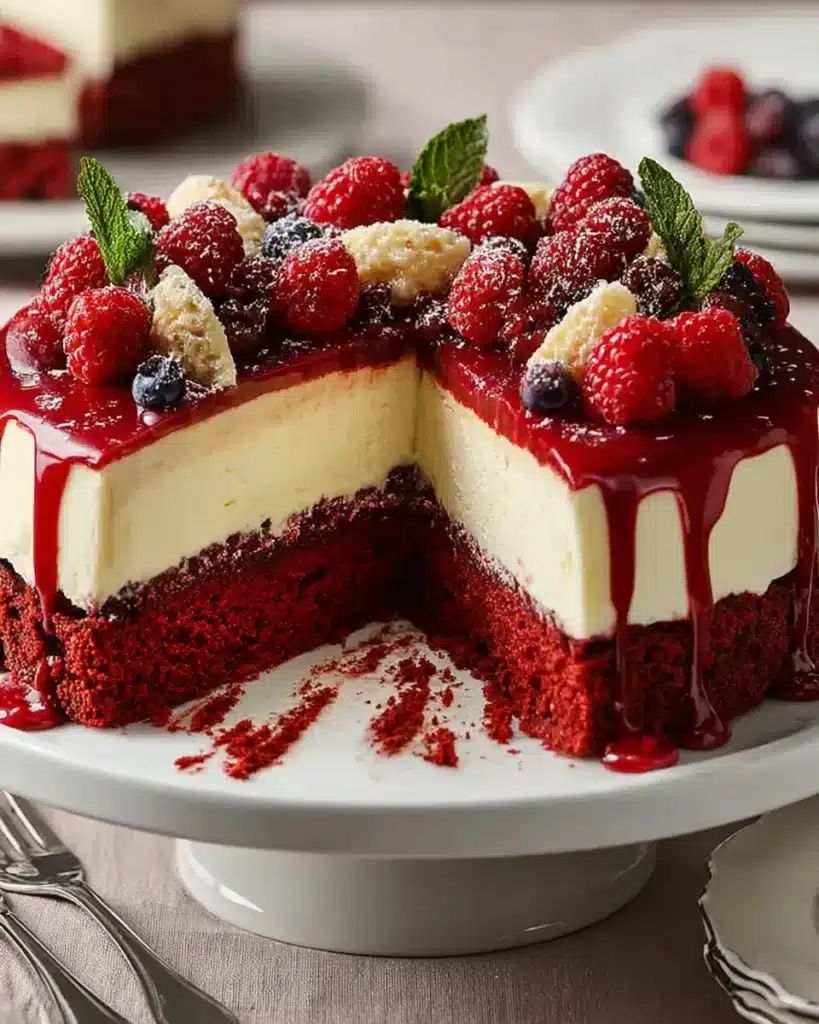
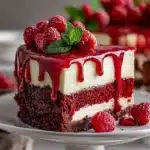
- Visually stunning: those bold red layers against creamy white cheesecake.
- Customizable: add berries, drizzle chocolate, or switch up the frosting.
- Crowd-pleasing: it’s almost impossible to find someone who doesn’t like it.
Quick Nutritional Highlights of Red Velvet Cheesecake Bliss
- Roughly 350 calories per slice (worth every one).
- Want to lighten it up? Try:
- Low-fat cream cheese
- Less sugar in the frosting
- Smaller portion sizes (yes, that counts).
Ingredients & Tools for Red Velvet Cheesecake Bliss
Essential Ingredients:
- All-purpose flour
- Sugar
- Unsweetened cocoa powder
- Buttermilk
- Vinegar
- Cream cheese
- Heavy cream
- Eggs
- Natural red food coloring (beet-based for a clean flavor)
Tools You’ll Need:
- Stand or hand mixer
- Springform pan
- Offset spatula
- Mixing bowls
- Water bath setup
Step-by-Step Recipe Instructions for Red Velvet Cheesecake Bliss
Step 1: Preparing the Red Velvet Cake Layer
- Mix the dry ingredients first: whisk flour, cocoa powder, sugar, baking soda, and a pinch of salt together. This ensures the cocoa distributes evenly so you don’t end up with dark streaks.
- Add the wet ingredients: gently whisk in buttermilk, eggs, vinegar, vanilla, and natural red coloring until smooth. The vinegar reacts with the baking soda—this is what gives red velvet its tender crumb.
- Bake: pour into a greased springform pan and bake at 350°F (175°C) until the top is lightly springy and a toothpick comes out clean (around 25–30 minutes).
- Cool completely: place on a wire rack and let it rest at least 1 hour.
Chef’s note: Patience is key here. A warm cake will melt the cheesecake layer and cause sliding—this is where most people mess up.
Step 2: Crafting the Cheesecake Layer
- Beat cream cheese until silky: use a stand mixer or hand mixer on medium speed. Start with softened cream cheese to avoid lumps.
- Add sugar gradually: this helps it dissolve smoothly. Follow with eggs (one at a time), then heavy cream and vanilla. Don’t overbeat—the goal is creamy, not airy.
- Prepare the water bath: wrap the outside of your springform pan in foil, set inside a larger roasting pan, and pour hot water halfway up the sides. This gentle heat prevents cracks.
- Bake low and slow: 325°F (160°C) for about 50–60 minutes, until the center has a slight wobble.
- Cool gradually: leave the oven door cracked open for 30 minutes before removing. Then let it come to room temp before chilling.
Chef’s note: Most cracks happen when cheesecake cools too quickly—treat it gently.
Step 3: Assembling Layers with Cream Cheese Frosting
- Level if needed: trim the cake top with a serrated knife so layers stack evenly.
- Stack carefully: place the red velvet cake layer at the bottom of your serving plate or cake board. Top with cheesecake (invert it gently out of the pan).
- Add frosting between layers: spread a thin coat of cream cheese frosting between cake and cheesecake for stability.
- Frost the exterior: use an offset spatula for smooth sides and a clean top.
Chef’s note: Chill both layers slightly before stacking—it makes handling easier and keeps things firm.
Step 4: Final Touches & Chilling
- Chill, chill, chill: refrigerate for at least 4 hours, preferably overnight. This allows flavors to meld and layers to firm.
- Decorate like a pro:
- Shaved chocolate or cocoa dusting for drama
- Fresh raspberries or strawberries for color contrast
- Drizzle of ganache or white chocolate for elegance
- Frosting rosettes piped around the edge for a bakery finish
Chef’s note: Cold slices cut cleaner. Dip your knife in hot water, wipe between cuts, and you’ll get those perfect picture-worthy layers.
Expert Tips for Red Velvet Cheesecake Bliss Success
- Water bath trick: prevents cracks in your cheesecake.
- Cool layers separately: rushing this step leads to disaster.
- Presentation ideas: pipe frosting rosettes, top with berries, or dust with cocoa.
- Freezer-friendly: wrap tightly, freeze up to 2 months.
Serving & Pairing Suggestions for Red Velvet Cheesecake Bliss
Perfect Occasions
Red Velvet Cheesecake Bliss is a showstopper, which makes it ideal for:
- Valentine’s Day – the red hue and creamy layers scream romance. Serve by candlelight for maximum effect.
- Birthdays – it doubles as both a “cake” and a “cheesecake,” so you’ll cover all tastes in one dessert.
- Weddings & Anniversaries – its elegant look makes it feel right at home on a tiered dessert table.
- Cozy Dinners at Home – slice it a little smaller, serve with coffee, and you’ve got a restaurant-worthy dessert at your own table.
Perfect Pairings
- Strong Coffee or Espresso – the bitterness balances the richness of the cheesecake.
- Hot Chocolate with Whipped Cream – for a decadent, over-the-top pairing, especially in colder months.
- Dessert Wine – a late harvest Riesling or Moscato works beautifully with its tangy-sweet profile.
- Rosé or Sparkling Wine – light and refreshing, they cut through the richness and keep it celebratory.
Family Favorite Twist
In my family, the cake is always served extra cold, with a generous spoonful of cream cheese frosting on the side (because one layer just isn’t enough). Sometimes we scatter a few fresh berries around the plate for brightness. The contrast of chilled creamy layers against tart berries? Pure bliss.
Plating Tips (Bonus)
- Use a hot knife for clean slices that show off those dramatic red-and-white layers.
- Add a dusting of cocoa or powdered sugar right before serving—it looks professional with zero effort.
- Garnish each plate with raspberries or strawberries to play up the red velvet theme.
Related Recipes to Try After Red Velvet Cheesecake Bliss
- Pumpkin Spice Cake with Cream Cheese Frosting — if you love cream cheese frosting, this warmly spiced cake is a seasonal must.
- Dulce de Leche Cheesecake Bars — a caramel-rich twist on cheesecake, easier to serve in bar form.
- Strawberry Cheesecake Cookies — bite-sized cheesecake goodness with a fruity twist.
- Strawberry Shortcake Layer Cake — another show-stopping layered cake with fresh, bright flavors.
- Delicious Butter Pecan Cake — rich, nutty, and indulgent, perfect for anyone who loves decadent desserts.
Benefits of Red Velvet Cheesecake Bliss
| Benefit | Why It Matters |
| Visually Stunning | Those red and white layers look bakery-perfect on any table. |
| Beginner-Friendly | Step-by-step method makes it doable even if it’s your first layered cake. |
| Customizable | Add berries, drizzle chocolate, or swap frosting flavors. |
| Crowd-Pleasing | Cheesecake lovers and cake lovers both win here. |
| Make-Ahead Dessert | Tastes even better the next day—perfect for parties. |
| Freezer-Friendly | Can be frozen for up to 2 months without losing flavor or texture. |
| Balanced Sweetness | Rich and indulgent without being overly sugary. |
| Special-Occasion Ready | Works for Valentine’s, birthdays, weddings, or even cozy nights in. |
FAQs About Red Velvet Cheesecake Bliss
How long does it last in the fridge?
Up to 5 days, tightly covered.
Is it beginner-friendly?
Yes—follow the steps and you’ll pull it off.
What can I use instead of cream cheese?
Mascarpone works, though it’s richer. Greek yogurt can lighten it.
How many calories per slice?
Around 320–350 calories.
Can I make it ahead?
Yes—actually better if chilled overnight.
Conclusion & Final Thoughts on Red Velvet Cheesecake Bliss
Red Velvet Cheesecake Bliss isn’t just another dessert. It’s a centerpiece, a memory-maker, and quite honestly, a little slice of happiness. Between the tangy cheesecake, the rich velvet layers, and the creamy frosting, it checks all the boxes of indulgence.
In my family, this cake marks celebrations, milestones, and Sunday dinners. It’s more than food—it’s tradition.
Now it’s your turn. Bake it, share it, and let this recipe become part of your own tradition. And when you do—send a picture. I want to see your version of Red Velvet Cheesecake Bliss.
And don’t forget—invite visite my page Pinterest for more recipes, tips, and kitchen inspiration.
PrintRed Velvet Cheesecake Bliss: The Dessert That Wins Every Time
Red Velvet Cheesecake Bliss is indulgent, comforting, and unforgettable. With the velvety tang of cheesecake paired with the cocoa-kissed charm of red velvet cake, it’s both elegant and crowd-pleasing. Perfect for romantic dinners, family celebrations, weddings, or cozy gatherings.
- Prep Time: 30 minutes
- Cook Time: 1 hour 30 minutes
- Total Time: 2 hours (plus chilling time)
- Yield: 12 slices
- Category: Dessert
- Method: Baked
- Cuisine: American
- Diet: Vegetarian
Ingredients
- All-purpose flour
- Sugar
- Unsweetened cocoa powder
- Baking soda
- Salt
- Buttermilk
- Vinegar
- Eggs
- Vanilla extract
- Natural red food coloring (beet-based)
- Cream cheese
- Heavy cream
- Springform pan
- Offset spatula
Instructions
- Mix flour, cocoa powder, sugar, baking soda, and salt.
- Add buttermilk, eggs, vinegar, vanilla, and red coloring until smooth.
- Bake at 350°F (175°C) for 25–30 minutes, cool completely.
- Beat softened cream cheese until silky, add sugar, eggs one at a time, heavy cream, and vanilla.
- Prepare water bath, bake cheesecake at 325°F (160°C) for 50–60 minutes, cool gradually.
- Level cake if needed, stack red velvet cake and cheesecake with cream cheese frosting between layers.
- Frost the exterior smoothly using an offset spatula.
- Chill for at least 4 hours or overnight.
- Decorate with shaved chocolate, berries, ganache, or frosting rosettes.
- Slice with a hot knife for clean layers.
Notes
Chill both cake and cheesecake before stacking. Use a water bath to prevent cracks. Cold slices cut cleaner—dip knife in hot water for picture-perfect layers.
Nutrition
- Serving Size: 1 slice
- Calories: 350
- Sugar: 28g
- Sodium: 320mg
- Fat: 22g
- Saturated Fat: 12g
- Unsaturated Fat: 9g
- Trans Fat: 0g
- Carbohydrates: 32g
- Fiber: 1g
- Protein: 6g
- Cholesterol: 85mg
Keywords: red velvet, cheesecake, dessert, layered cake, cream cheese frosting