
Baked Cheese Mummies
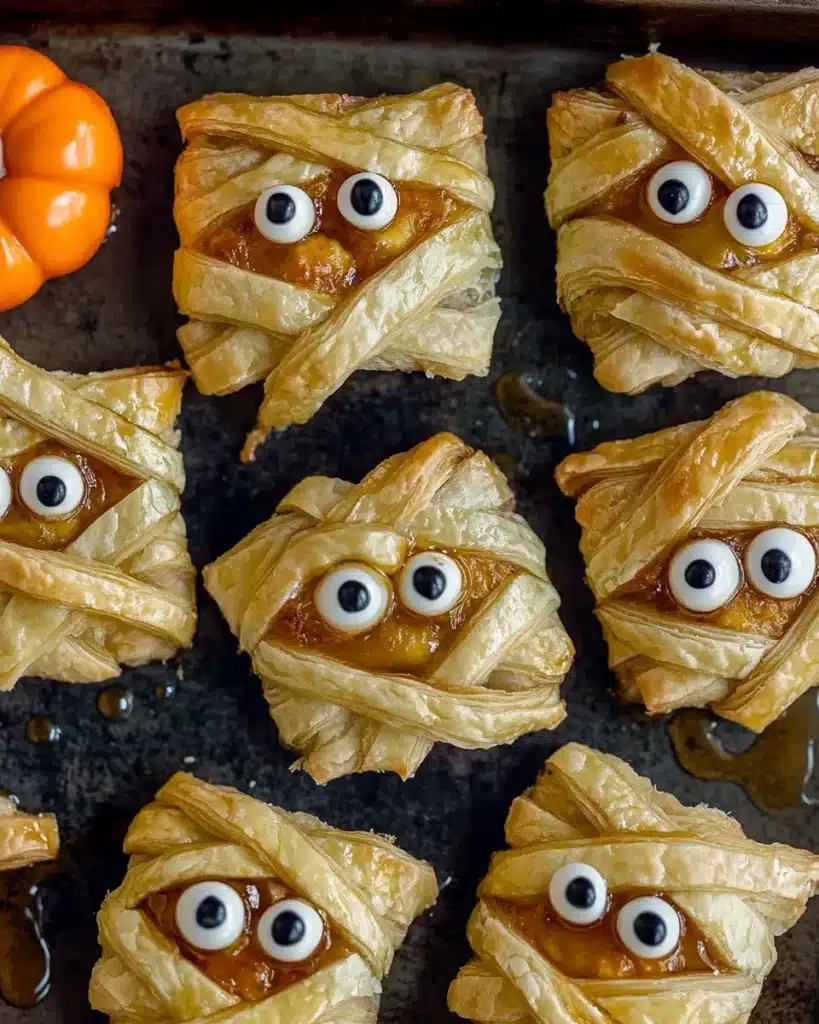
Looking for a Halloween snack that’s equal parts spooky and cheesy? These Baked Cheese Mummies are it. They’re golden, gooey, and totally irresistible. Think mini Brie en Croute dressed up for Halloween—perfect for kids, great for parties, and sneakily addictive for grown-ups, too.
A Little Halloween Confession
I used to be all about Halloween parties—fog machines, loud music, dramatic costumes. Now? I’m knee-deep in glitter and trying to convince my daughter that, yes, princesses can wear sneakers.
We ditched the adult parties, but honestly? Halloween got better. It’s about making little treats, dressing up as a family, and finding joy in the goofy stuff. Like these little mummies. Cute, cheesy, warm out of the oven—what more do you need?
Why These Spooky Halloween Snacks Work
This is what you want on a Halloween snack table. Something warm, flaky, cheesy, and just spooky enough to make people smile.
- Bite-sized and finger-food friendly
- Easy enough to make with kids
- Halloween-themed without being sugar bombs
They’re a fun twist on the classic baked cheese-in-pastry. But in mummy form? That’s just smart branding.
Table of Contents
What You’re Doing
Here’s the big idea:
- Take a round of cheese.
- Brush it with something sweet—honey or jam.
- Wrap it like a mummy in pastry strips.
- Bake until golden and gorgeous.
- Add candy eyes for maximum Halloween energy.
That’s it. Simple, fast, dangerously delicious.
Halloween Finger Foods You’ll Need 📋
| Ingredient | Quantity |
| Puff pastry (thawed) | 2 sheets |
| Mini cheese rounds | 14 |
| Honey or jam | ⅓ cup |
| Egg | 1 |
| Water | 1 tsp |
| Candy eyes or mini chips | 28 (2 per mummy) |
How to Make Halloween Mummy Snacks
Step 1: Get Set
Preheat your oven to 400°F. Line a baking sheet with parchment. Clean your counter. This goes fast.
Unroll your puff pastry onto a lightly floured surface. Roll each sheet into an 11-inch square. Don’t press too hard—you want it even, not thin.
Use a sharp knife or pizza cutter to slice into 9 squares per sheet. You only need 14, but hey, the extras are insurance.
Step 2: Add the Cheese
Unwrap your mini cheese rounds. (If you’re using Babybel-style rounds, ditch the wax.)
Place one cheese wheel in the center of a pastry square. Spoon a little honey or jam right on top. Just enough to give it a sweet edge—don’t drown it.
Step 3: Wrap Like a Mummy
Here’s where it gets fun.
Take a second square of puff pastry and slice it into thin strips—about ¼” wide. These are your “bandages.”
Now wrap those strips around your cheese. Crisscross, angle them, leave a little space for “eyes.” Don’t go full sarcophagus—cheese needs room to puff and breathe.
Seal the ends underneath gently. Press the pastry together if it feels loose. No gaps, no leaks.
Step 4: Paint and Bake
Whisk your egg with 1 tsp water. That’s your egg wash—aka golden-brown magic.
Brush each mummy generously. Don’t soak it, but don’t be shy. This gives you that crisp, glossy finish.
Slide the tray into your oven and bake for 15 to 20 minutes. You’re looking for puffed, deep golden pastry. Cheese should be oozy but not exploding.
Pro tip: If they’re pale at 15, give them 3–5 more minutes. Don’t pull them too early—color equals flavor.
Step 5: Add the Eyes
Let the mummies cool just a bit—hot cheese burns are real.
Use a dab of honey or jam to stick on candy eyes or mini chocolate chips. Right where that gap is. Boom—mummy complete.

Notes on Making Halloween Mummy Snacks
- Make Ahead: Assemble (wrap but don’t bake), then refrigerate up to 24 hours.
- Add Egg Wash Last Minute: Brush just before baking for best texture.
- Flavor Twist: Try fig or chili jam for a grown-up kick.
- Freezer Friendly: Freeze wrapped (unbaked) mummies on a tray. Transfer to a bag. Bake from frozen—add 3–5 minutes.
More Spooky Halloween Snacks You’ll Love
Planning a Halloween spread? Don’t stop at mummies—these themed bites round out your table with just the right mix of creepy and craveable:
- Spooky Halloween snacks: These Halloween Skull Potatoes are eerie, crispy, and make the perfect sidekick to your mummies.
- Easy Halloween finger foods: Keep the mummy theme going with these savory, bite-sized Mummy Meatballs.
- Halloween party appetizers: These Breadstick Bones are a no-fuss, oven-baked hit for any spooky snack board.
- Kid-friendly Halloween snacks: This list of fun, festive ideas (originally 4th of July-themed) includes easy treats that can be Halloween-ified for your younger guests.
FAQ – Baked Cheese Mummies
Can I use different cheese?
Sure. Mini brie or goat cheese rounds work—just make sure they’re firm enough to wrap.
What’s the best puff pastry?
All-butter if you can get it. Let it thaw fully before using, or it’ll tear.
Can I make these vegan?
Use plant-based cheese and pastry, and skip the egg wash. Brush with oat milk for color.
How far ahead can I prep?
Wrap and chill for a day. Bake right before serving for max puff and melt.
Can I freeze them?
Absolutely. Wrap them up, freeze raw. Bake straight from frozen at 400°F, add extra time.
Wrap-Up & Call to Action
These Baked Cheese Mummies are everything a Halloween snack should be—cheesy, flaky, fun, and totally doable. They’re perfect Halloween party appetizers, kid-friendly Halloween finger foods, and right at home on any spooky snack table.
Make a batch. Make two. Eat one before your guests arrive—we won’t judge.
Make these. Tag them. Own Halloween.
And hey—if you want more Halloween-themed food ideas, head over to my Pinterest page where I share all kinds of spooky snacks, party tips, and easy holiday recipes.
This is the mummy I want to eat.
PrintBaked Cheese Mummies
Looking for a Halloween snack that’s equal parts spooky and cheesy? These Baked Cheese Mummies are golden, gooey, and totally irresistible—perfect for kids, great for parties, and sneakily addictive for grown-ups, too.
- Prep Time: 20 minutes
- Cook Time: 20 minutes
- Total Time: 40 minutes
- Yield: 14 mummies 1x
- Category: Appetizer
- Method: Baking
- Cuisine: Halloween
- Diet: Vegetarian
Ingredients
- 2 sheets puff pastry (thawed)
- 14 mini cheese rounds
- ⅓ cup honey or jam
- 1 egg
- 1 tsp water
- 28 candy eyes or mini chocolate chips (2 per mummy)
Instructions
- Preheat oven to 400°F. Line a baking sheet with parchment paper.
- Roll out each puff pastry sheet into an 11-inch square. Slice into 9 squares per sheet. Set aside 14 squares for use.
- Unwrap the mini cheese rounds. Place each in the center of a pastry square. Add a small spoonful of honey or jam on top.
- Cut extra pastry squares into ¼” strips. Wrap the strips around each cheese round to resemble a mummy, leaving space for the eyes.
- Whisk the egg with 1 tsp water. Brush each wrapped cheese round with the egg wash.
- Bake for 15–20 minutes until golden and puffed. Cheese should be oozy but not exploded.
- Cool slightly, then use a dab of honey or jam to stick on candy eyes or chocolate chips in the uncovered area.
Notes
Wrap but don’t bake ahead—refrigerate up to 24 hours. Brush with egg wash just before baking. Try fig or chili jam for a twist. Freeze unbaked and bake straight from frozen with 3–5 extra minutes.
Nutrition
- Serving Size: 1 mummy
- Calories: 180
- Sugar: 2g
- Sodium: 230mg
- Fat: 12g
- Saturated Fat: 6g
- Unsaturated Fat: 5g
- Trans Fat: 0g
- Carbohydrates: 10g
- Fiber: 0g
- Protein: 6g
- Cholesterol: 25mg
Keywords: Halloween snacks, baked cheese mummies, spooky appetizers, kid-friendly Halloween food