No Bake Banana Split Cake — The Ultimate Summer Treat
Remember banana splits from your childhood? That soft banana, the cold ice cream, sticky pineapple, a cherry perched on top like it owned the place. Now imagine that—but in cake form. No oven, no scooping, just layers of creamy, fruity goodness chilled to perfection. This no bake banana split cake is summer’s MVP: fast, festive, and always a hit at backyard BBQs or family get-togethers.
Why You’ll Love This Banana Split Cake from Scratch
No-Bake Convenience
Let’s keep it real: who wants to bake when it’s 90 degrees outside? This cake skips the oven completely. Chill it, slice it, done.
Versatility for Events
Birthday party? Potluck? Tuesday night because you deserve it? This dessert flexes—make it a layered banana split cake, go wild with toppings, or dress it down for a casual weeknight treat.
Delicious Flavor & Texture Contrast
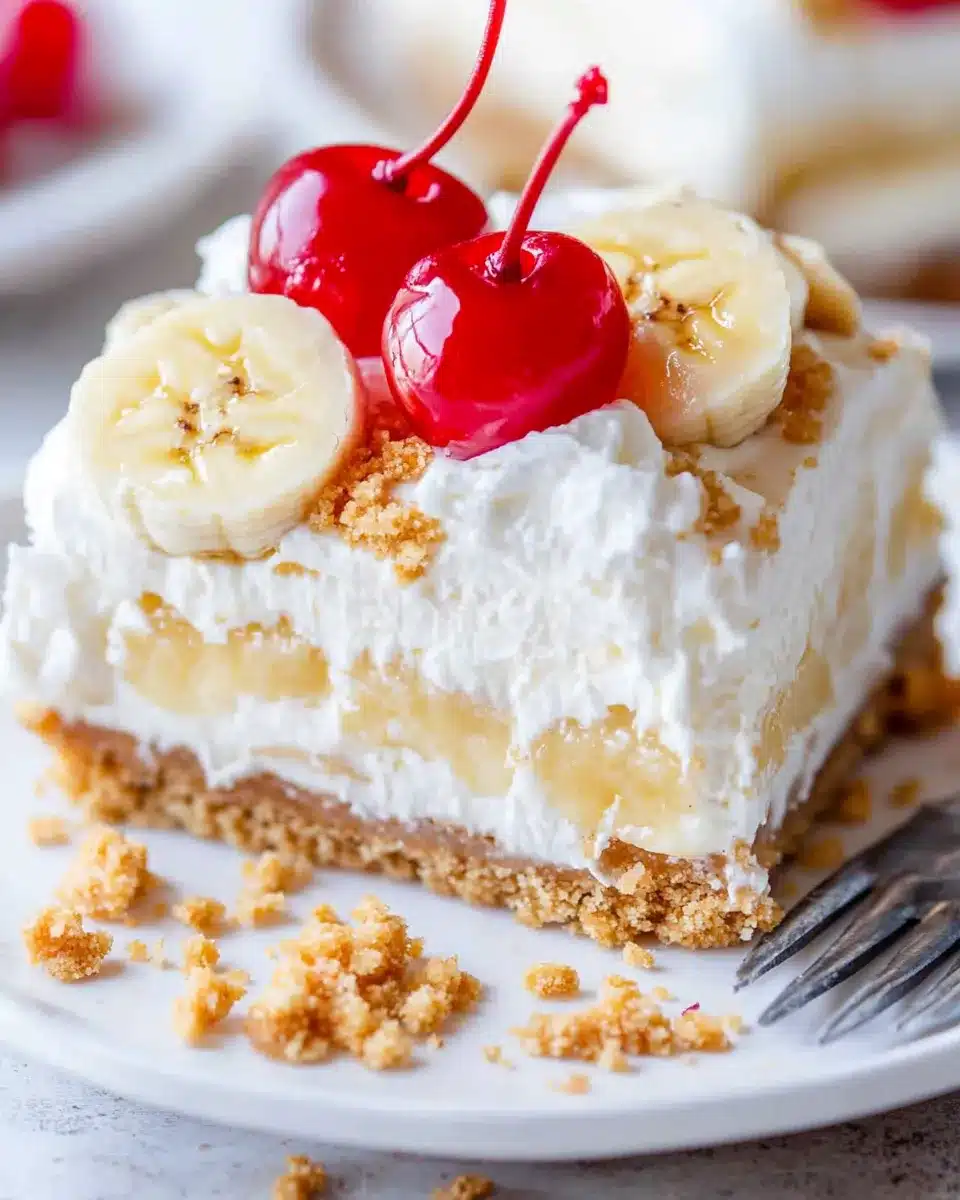
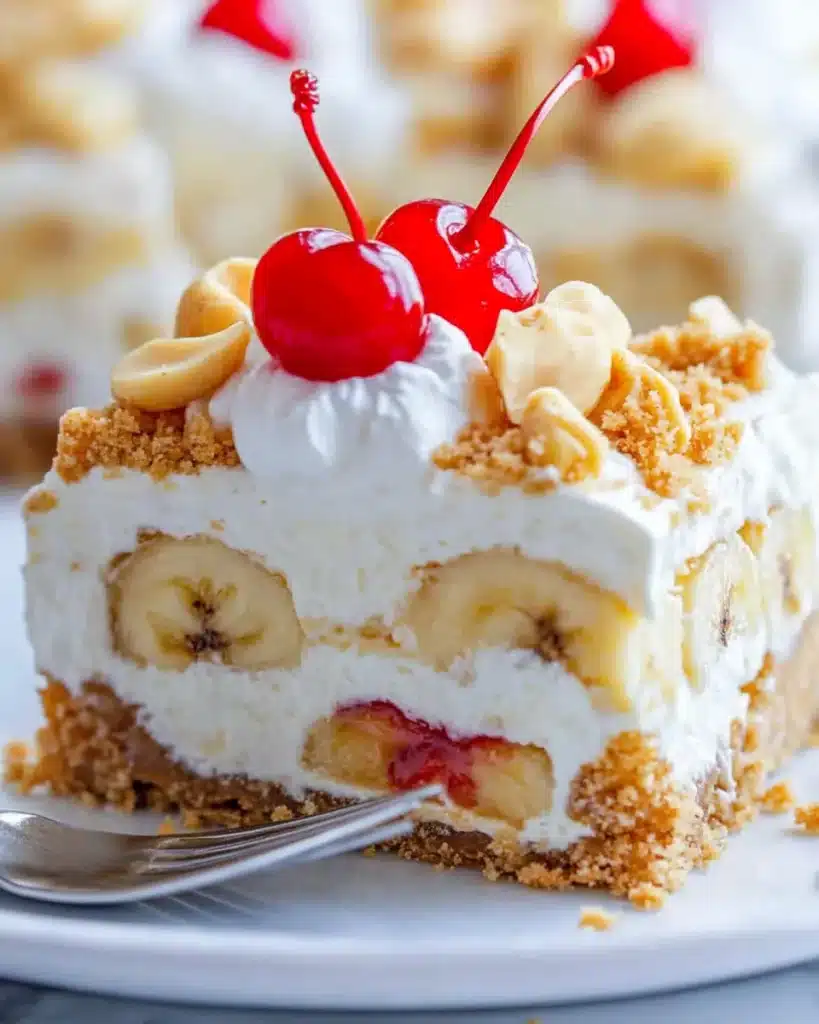
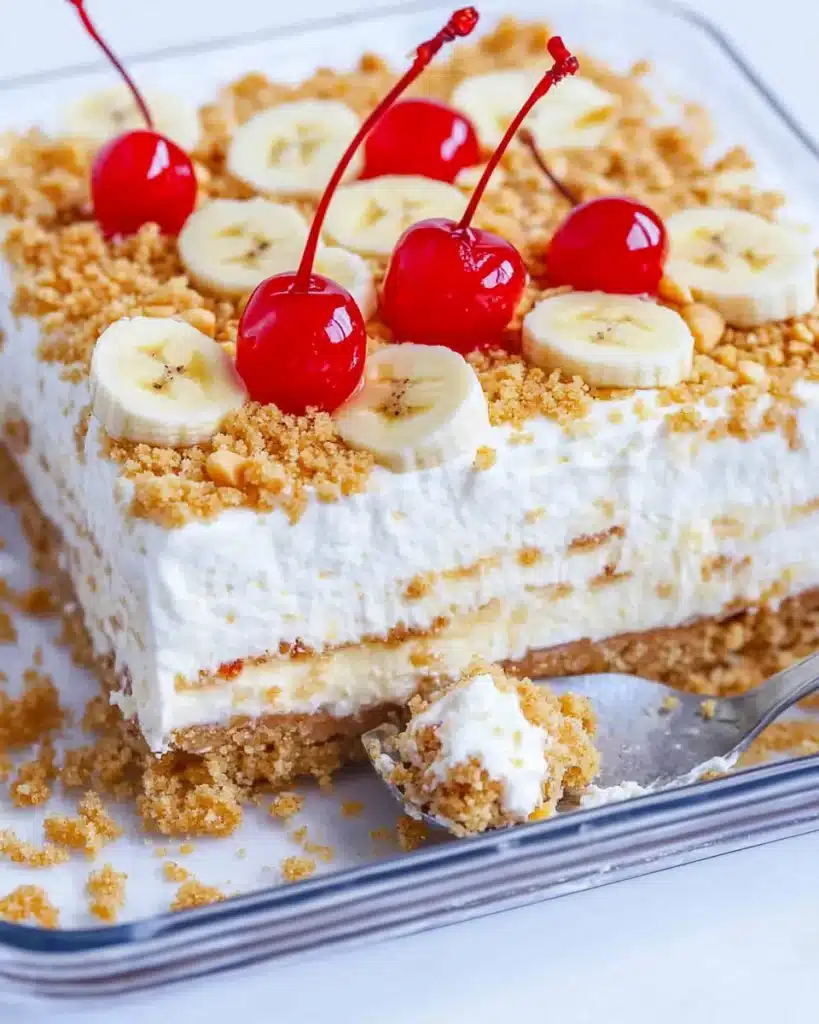
Think creamy cheesecake-style base, fresh bananas, juicy crushed pineapple, fluffy whipped topping, salty peanuts, and a cherry on top. Soft, crunchy, sweet, tangy banana sundae cake done right.
Easy Preparation
No mixers, no piping bags, no drama. This homemade banana split cake builds in layers like a pro wrestler stacks pancakes: fast and firm.
Festive Presentation
You’ve got color, texture, and layers. Looks fancy, tastes like childhood. What more do you want?
Table of Contents
Tips & Tricks to Make the Best Banana Split Cake
- Use fresh bananas—not overripe, not green. You want sweet and firm.
- Toss banana slices in lemon juice to prevent browning.
- Drain the pineapple well—nobody wants a soggy crust.
- Hot knife = clean cuts. Dip in hot water, wipe dry, slice like a boss.
- Chill thoroughly—at least 4 hours, overnight is better.
- Customize like a champ: vanilla or banana pudding, sliced strawberries, even a drizzle of fudge for a banana cream cake twist.
Leftovers
- Store in the fridge, covered, for up to 3 days.
- Don’t freeze it—the whipped topping and fruit won’t survive the frost.
- If prepping ahead, wait to garnish with cherries until just before serving to keep them picture-perfect.
Ingredients for a Classic Banana Split Dessert Cake
Here’s what you’ll need for this banana split dessert masterclass:
- 2 cups graham cracker crumbs (or crush ~14 full crackers)
- 2 tbsp granulated sugar
- 6 tbsp unsalted butter, melted
- 8 oz cream cheese, softened
- 1 cup powdered sugar
- 3-4 ripe bananas, sliced
- 1 (15 oz) can crushed pineapple, well-drained
- 1 (8 oz) tub whipped topping, thawed
- ½ to 1 cup salted peanuts, chopped
- Maraschino cherries, for topping
Step-by-Step: How to Make a No-Bake Banana Split Cake from Scratch
Alright, aprons on. Let’s layer this beauty the right way.
1. Build the Crust
In a bowl, mix graham cracker crumbs, sugar, and melted butter. It should feel like damp sand. Press it firmly into the bottom of a 9×9 or 8×8-inch pan. Use the bottom of a measuring cup to flatten it nice and tight. Pop it in the fridge while you prep the rest—cold crust = strong base.
2. Make the Cream Cheese Layer
In another bowl, beat softened cream cheese with powdered sugar until smooth. No lumps—this is your silky layer. Spread it gently over the crust. Take your time. A little offset spatula or the back of a spoon works wonders.
Chef tip: If your cream cheese isn’t fully room temp, you’ll fight it—and lose. Give it 30 minutes on the counter first.
3. Add the Fruit Layers
Lay banana slices across the cream cheese layer in a single, even row. Overlap a bit, but don’t pile them. Then spoon on the drained pineapple—spread it out evenly. If the pineapple is too wet, you’ll get a soggy bottom. Nobody wants a soggy bottom.
4. Whip It (Topping)
Take that tub of whipped topping and spread it over the fruit layer. Go edge to edge. Smooth it out like frosting a cake. Gentle, no dragging.
5. Garnish Like You Mean It
Sprinkle chopped peanuts across the top like you’re seasoning steak—generous but not chaotic. Add cherries wherever they look good (or where your kid will want to grab them first).
Optional: drizzle chocolate syrup or hot fudge if you’re feeling wild.
6. Chill Time
Cover with plastic wrap or foil and refrigerate for at least 4 hours. Overnight is even better. The flavors meld, the layers set, and you get clean slices.
7. Slice & Serve
Hot knife trick: dip your blade in hot water, wipe dry, slice. Repeat for each cut. It’ll glide through that whipped layer and banana base like butter.
Serve cold. Watch people go back for seconds before they finish their first.
Serving Notes for Your Banana Sundae Cake
- Best eaten within 1–2 days.
- Bananas stay fresh longer with that lemon juice tip.
- Graham crust holds up well in the fridge—but not forever. After 3 days, it starts to soften. Plan accordingly.
More No-Bake Dessert Recipes Like This Homemade Banana Split Cake
Can’t get enough of chilled, fruity desserts? Here are some reader favorites straight from my kitchen:
- Dreamy pineapple dessert just like Grandma used to make – nostalgic, creamy, and a total crowd-pleaser.
- Another perfect no-bake summer cake to try – lemony, light, and layered for lazy days.
- If you love banana desserts, don’t miss this moist classic – banana bread done the old-fashioned way.
- Cool down with this patriotic no-bake treat – red, white, and blueberries in every bite.
- Try this layered strawberry shortcake cake next – stacked high and ready to impress.
- Another chilled fruity dessert idea: strawberry banana pudding – creamy layers, fresh fruit, no oven.
FAQ About Layered Banana Split Cake
Can I freeze this cake?
Nope. It’ll turn into a frosty mess. Stick with refrigeration.
Can I swap pudding flavors?
Absolutely. Vanilla or banana pudding gives you that banana pudding cake flavor hit.
How do I keep bananas from browning?
Light lemon juice toss before layering. Works like a charm.
Can I make this the night before?
Definitely. Just add peanuts and cherries right before serving to keep it
Conclusion + Call to Action
There you go: the No Bake Banana Split Cake—easy, nostalgic, and dangerously delicious. It’s the kind of dessert that disappears fast, so maybe stash a slice in the back of the fridge for yourself. (You earned it.)
Now it’s your turn: make it, taste it, and show it off. Post a pic, tag your dessert crew, and if you’ve got a killer variation—tell us! Want more recipes that hit like this one? Follow me on Pinterest for daily kitchen inspiration and sweet no-bake gems.
This is the kind of cake I want to eat—and I bet you will too.
No Bake Banana Split Cake — The Ultimate Summer Treat

This no bake banana split cake is the ultimate summer treat—layers of creamy cheesecake, bananas, pineapple, whipped topping, peanuts, and cherries, all on a graham cracker crust. Easy to make, no oven needed, and a total crowd-pleaser.
- Prep Time: 20 minutes
- Cook Time: 0 minutes
- Total Time: 4 hours 20 minutes
- Yield: 9 servings 1x
- Category: Dessert
- Method: No Bake
- Cuisine: American
Ingredients
- 2 cups graham cracker crumbs
- 2 tbsp granulated sugar
- 6 tbsp unsalted butter, melted
- 8 oz cream cheese, softened
- 1 cup powdered sugar
- 3–4 ripe bananas, sliced
- 1 (15 oz) can crushed pineapple, well-drained
- 1 (8 oz) tub whipped topping, thawed
- ½ to 1 cup salted peanuts, chopped
- Maraschino cherries, for topping
Instructions
- Mix graham cracker crumbs, sugar, and melted butter in a bowl. Press into bottom of a 9×9 or 8×8-inch pan. Chill.
- In a bowl, beat cream cheese with powdered sugar until smooth. Spread over crust evenly.
- Layer banana slices over the cream cheese mixture. Spoon and spread drained pineapple over bananas.
- Spread whipped topping over the fruit layer, smoothing the top.
- Sprinkle chopped peanuts over the top and decorate with maraschino cherries.
- Cover and refrigerate for at least 4 hours or overnight.
- Slice with a hot knife and serve cold.
Notes
Toss banana slices in lemon juice to prevent browning. Drain pineapple well to avoid a soggy crust. Best eaten within 1–2 days. Do not freeze.
Nutrition
- Serving Size: 1 square
- Calories: 375
- Sugar: 26g
- Sodium: 150mg
- Fat: 24g
- Saturated Fat: 13g
- Unsaturated Fat: 9g
- Trans Fat: 0g
- Carbohydrates: 35g
- Fiber: 2g
- Protein: 4g
- Cholesterol: 25mg
Keywords: banana split cake, no bake dessert, summer cake, fruit dessert